(Last updated February 2020)
The Steps Tab
Lead the self-represented litigant down the pathway to justice with progressive “Steps.”
The central theme of the A2J Author® software is, of course, “Access to Justice” for self-represented litigants. This theme is represented by a pathway marked by “Signs” (Figure 6a) which indicate progressive steps towards assembling a document to be filed with a court clerk. In the case of web intake the signs may represent progressive steps toward filing an intake application online. In either event, the Signs help give structure to the A2J Guided Interview® and provide a sense of progress to the self-represented litigant.

Figure 6a: The Pathway in A2J Author® - representing “access to justice.”
Creating these “Steps” in A2J Author® is quite simple. Associating the A2J Guided Interview’s questions to correspond with each of the steps is also quite simple. Instructions for both are discussed below.
Creating Steps
The Steps Tab allows you to break up your A2J Guided Interview into separate steps. An A2J Guided Interview can have between 1 and 13 different steps. By selecting the number of steps from the dropdown menu labeled “Number of Steps”, you can add up to a total of 13 steps. A blank A2J Guided Interview comes pre-populated with 4 steps. Each Step may contain an unlimited number of Questions. After Questions under a particular Step are answered, the end-user moves one Step closer to the courthouse.

Figure 6b: The Steps Tab allows you to divide up your interview questions into logical groupings that “make sense” to the end-user. You can think of them as headings in an outline.
Each Step is visually represented under the Steps Tab as a colored sign. As you add Steps using the dropdown menu, you will notice additional colored sections being added to the Steps tab. Once the number of desired Steps is selected, the text or title of each Step can be modified by selecting each numbered Sign and modifying the text. Simply change the text in the field labeled “Step Sign.” Lowercase or capital letters can be used. A maximum of two lines of text, including no more than 40 characters, can be used in a Sign. The maximum number of characters allowed per line is 20. To induce the text to wrap from one line to the next, you need to include a space within your characters (ex. 12345678912345678912 [space] 12345678912345678912). But, due to variations in character width, as little as 12 characters per line may be permitted.
Default Steps
A2J Author® provides the following 4 default Steps in a new interview: (0) Access to Justice, (1) Do You Qualify?, (2) Do You Agree?, and (3) Your Information (Figure 6c). The Sign for Step “0” contains the default language “Access to Justice”. Most authors use this initial step to welcome the end-user to the interview and collect his or her name and avatar choice.
The default Sign for Step (1) is entitled “Do You Qualify?” Asking the end-user “qualifying” questions is usually the best choice for an initial step following the collection of name and gender. For example, if there are answers to questions that would potentially preclude an end-user from using the form for which the Guided Interview is designed, then those questions are best asked up front.
The default Signs for Steps (2) and (3) are entitled “Do You Agree?” and “Your Information,” respectively. These are merely suggested titles and can be changed to correspond with how you have decided to organize the Questions in your A2J Guided Interview®.

Figure 6c: Default Steps provided in a new A2J Guided Interview.
It is important to collect name and avatar choice up front in the interview, either under Step (0) or Step (1). The interview looks best when there are two avatars - the guide avatar and the end user avatar. Collecting the end-user’s name up front allows you to later personalize the interview by recalling their name in the text of a question using a macro.
Starting and Exit Points ("Exit: Save and Resume")
The Steps Tab is also where you set the Starting Point and the Exit Point for your A2J Guided Interview. By default, your interview will start with the 1st question under the 1st step. If you would like to differ from this default behavior, you can set a different Starting Point by choosing a different question next to the "Starting Point" field at the top of the Steps Tab. Most authors choose to stick with the default behavior of starting with the 1st question in the 1st step. If you would like to do so as well, you do not need to do anything with this field.
A special feature in A2J Author allows end users to exit and come back to the interview at a later time. If the server where you host your A2J Guided Interview is set up for user accounts, authors can allow their end users to exit, save their answers, come back later, and reload their already partially completed answer file. This is called "Save and Resume" within A2J Author.
When authors enable "Save and Resume" an "Exit" button appears at the top of the navigation bar within the A2J Viewer for the end user to click on.
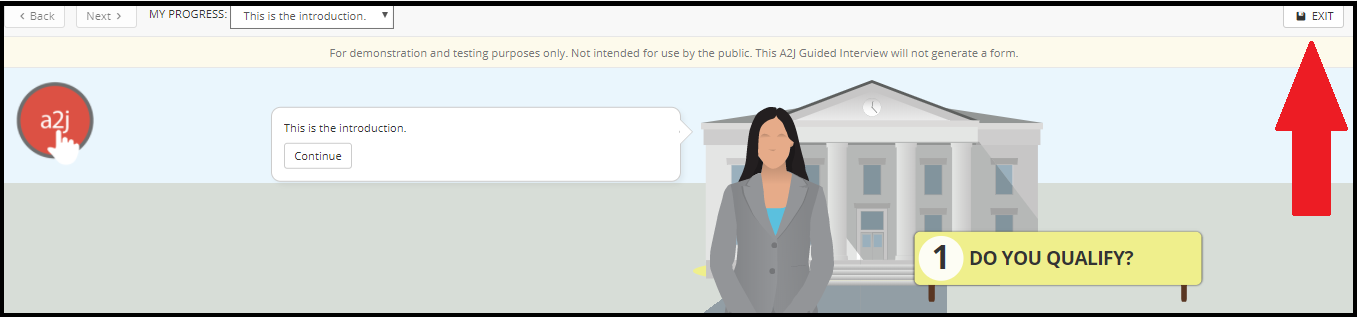
To enable "Save and Resume":
- Create a standalone exiting question on Pages Tab. Generally authors place this question in the last step of the interview, but step placement is irrelevant. It's a "standalone" question because no other questions branch to it via buttons or logic. The end user only accesses it if they click the "Exit" button in the navigation bar within the A2J Viewer.
- This question should explain to the end user that they have click the Exit button and verify that they actually want to exit the interview and did not just hit the button accidentally.

- This question should have at least 2 buttons. One button called "Return" in the example above is set to the destination of [Resume interview]. This will take the end user who mistakenly clicked the top navigation "Exit" back to the question they were on when they hit the "Exit" button. The second button called "Exit" in the example above is set to [Exit - Save Incomplete Form]. This exits the user out of the interview and packages all their answered questions into an answer file which is also passed to the hosting server.
- Once you have created this standalone question, you need to tell A2J Author that you want to enable this feature. To do so, go to the Steps Tab and set this standalone question as the "Exit Point" destination question at the top of the screen. Once there is a question in that Exit Point field, the A2J Viewer will display the "Exit" button to the end user within the interview. If there is no destination question in that field, the Exit button will not appear in the interview's navigation bar for end users.
